 Loading... Please wait...
- 01473 271500
- Home
- My Account
- Gift Certificates
- View Cart
Categories
Liquid Eyeliner
Posted on 3rd Dec 2018
The all new Ink Liner will create a glossy black effect that will last all day.
 The intense black pigment is plant based, made from charcoal powder which comes from oak. The formula also contains no iron oxide or carbon black. A fine felt tip brush makes application easy and allows you to draw thin and precise lines.
Before you begin, make sure you’re sitting comfortably with a mirror positioned slightly below your eyes. To keep a steady hand, try placing your elbow on a surface in front of you. This will help you keep your balance. Start at the inside corner of the eyelid and move the brush gently outwards. If you’re worried about keeping it even, try drawing dots first and then connecting them. Remember to use light pressure as too much force could result in slipping and smudging. Slightly pulling the outer corner of the eye can also help keep the line straight. Try to stay as close to the lash line as possible and add a coat or two of our Ultimate Conditioning Mascara. Clean up any bumpy edges with a cotton bud or a small brush.
WINGED EYELINER
 First, draw a thin line from the inner to the outer corner of the eyelid, keeping close to the lash line.
 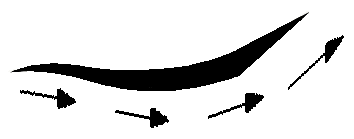 To make the wing, draw a small line starting from the outer corner and following the curve of the lower lash line. Next, connect the tip of the wing to create a triangle shape. Try making the line thicker to make the look stand out more. The key to this look is having the sharpest wing tip possible so neaten up any uneven edges with a cotton bud.
DOUBLE WINGED EYELINER
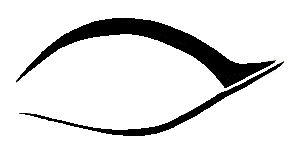 To create this look, first draw a simple winged eyeliner. Next, use the ink liner to draw along the bottom lash line, starting about a third of the way along.
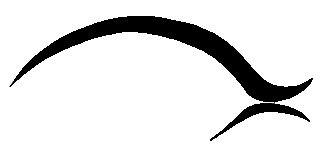 Extend the line upwards, remaining parallel to the bottom of the wing but keeping a small gap between the two. This line should be the same length of the wing or slightly shorter. Slightly thicken the line whilst ensuring it remains pointed. Try switching up the look by using varying lengths and thicknesses. One look to try is the fishtail which can be created by drawing curved wings that point in opposite directions.
To create a smudged look, create a wing using the Ink Liner then add a small amount of black eyeshadow over the lash line. Keep the bottom of the wing sharp and straight. To take this look even further, try using a shimmering eyeshadow or adding glitter.  Feeling brave? The Ink Liner is perfect for experimenting with exciting and bold looks. The fine felt tip makes it easy to draw precise lines. Test out different shapes for a brave new look.
The intense black pigment is plant based, made from charcoal powder which comes from oak. Creating a glossy black effect that will outlast the night, this liner also contains no iron oxide or carbon black. A fine felt tip brush makes applying the liner fast and easy. It also allows you to draw precise and thin lines, perfect for experimenting with new looks.
Before you begin, make sure you’re sitting comfortably. To keep a steady hand and make a straight line, try placing your elbow on the surface in front of you for balance. For a simple look, start at the inside corner of the eyelid and move outwards. If you’re worried about keeping it even, try drawing dots first and then joining them up to complete the look. Remember, keep your hand steady but only use light pressure when applying. Using too much force could result in smudging. Slightly pulling the outer corner of the eye can also help keep the line straight. Try to stay as close to the lash line as possible and add a coat or two of our Ultimate Conditioning Mascara to complete the look. To avoid unsightly smudging, keep your eyes closed for as long as possible whilst the eyeliner dries. Clean up any bumpy edges with a cotton bud or a small brush.
To create a more dramatic look, try developing into winged eyeliner. This is created by adding a wing to the outer corner of the eye. To do this, first draw a thin line from the inner to the outer corner of the eye. To make the wing, draw a small line staring from the outer corner, following the slant of the eye. Next, connect the tip of the line. Increase the thickness of the line to add drama and make the look stand out more. The key to this look is having the sharpest wing tip possible, so neaten up any uneven edges with concealer and an angled brush. This can be worn alone or over any colour eyeshadow, depending on the desired finish.
The Ink Liner can be used to create any number of looks ranging from very simple to very daring. One idea to try is a double winged eyeliner. This can be done by first creating a simple winged eyeliner. Next, use the Ink Liner to draw a line along the bottom lash line, starting about 2/3 of the way along the eye and continuing outwards. The line should remain parallel to the bottom of the wing, keeping a small gap between the two. Extend the line to the same length as the wing or slightly shorter. Use a small brush and concealer to neaten up any bumpy edges. Switch up the look by using varying thicknesses and lengths.
To create a smudged look, try applying creating a wing with the Ink Liner then adding a small amount of black eyeshadow over the top. Use a small fluffy brush to lightly smudge the eyeshadow across and above the top of the wing. Keep the bottom line smooth and sharp for definition. To take this look even further, try using a shimmering eyeshadow.
Feeling brave? The Ink Liner is perfect for experimenting with exciting and bold looks. The thin felt tip makes precise application a breeze and allows for the thinnest of strokes. An easy way to begin is changing the length and angle of your winged eyeliner. This can change the shape of the eye and accentuate different features. Experimenting with this will help you find the look that suits your eye shape the best. For example, if you have rounded eyes, you may want to try elongating the wing.
Once dry, this eyeliner will not budge, making it perfect for everyday wear as well as for special occasions.
